Copyright © 2013 Dominik Rueß
Legal Notices
This article is part of pivot. pivot is free software: you can redistribute it and/or modify it under the terms of the GNU General Public License as published by the Free Software Foundation, either version 3 of the License, or (at your option) any later version.
pivot is distributed in the hope that it will be useful, but WITHOUT ANY WARRANTY; without even the implied warranty of MERCHANTABILITY or FITNESS FOR A PARTICULAR PURPOSE. See the GNU General Public License for more details.
In Section 7, “GNU General Public License” you can find a link to the license, or go directly to: http://www.gnu.org/licenses/
Table of Contents
- 1. Preface 1: Open Source and Supported Platforms
- 2. Preface 2: Do Backups !
- 3. What is pivot ?
- 4. Keep your Photographs and Videos Organized
- 5. Exemplary Use Cases
- 6. More Help
- 7. GNU General Public License
This software app is open source. This means I was not able to invest a lot of time and money into buying and testing different systems/platforms etc. The advantage of open source being completely free and open (as compared to commercial software, freeware or shareware) is usually not always completely free - the user may help the developers by sending them errors or improvement suggestions. Lastly, a note: please respect the GPL: If you use (parts of) this software in your own project, publish the complete source code of your own project, as well.
I developed this software app for different platforms (e.g. Windows, Ubuntu, Fedora). However, I can only develop for platforms which I own myself. If you think an important platform is missing, send me a suggestion. I would love to also deploy this software for Mac OS X, too. I just don't own a Mac. If you're interested, consider donating to this project and I'll hopefully soon be able to buy a Mac (Section 6.2, “Donate to the author”) and adapt and permanently support this software for it. Or get in touch with me for other solutions.
Always backup your files, also before using pivot!!!
Note
Photographs are precious! Don't loose them.
Keep a copy of unedited original photographs in a second directory structure (pivot can assist you in doing this, see Section 5.2.2, “Image viewer / Select files to copy for each destination”, for instance). This offers you the possibility to start over for re-editing some images - if needed a some point in future (e.g. different filters, higher resolution etc).
There are different philosophies about backing up data. However, you should always keep a copy of your files on a second data medium. People do accidentally delete their files, every now and then. Also any media can fail at some time. But consider the different durability of different media types (hard drives, CDs, tape drive, ...)
Also you may want to consider storing this secondary media somewhere else (e.g. in the basement or even in a different house). This also prevents accidental deletion of the data but more importantly it is physically separated from the primary medium, so extreme conditions (fire etc) won't affect this second medium.
On the internet, you can find many articles about backing up data properly. Inform yourself !
The Photo, Image and Video Organization Tool - Pivot - is a tool for the first step of the image (and video) processing tool chain. Pivot can organize your images from the hard drive or directly from the camera. It allows you to specify destination folders and filename patterns for the copying process. The organization is mainly based on the creation date and time of the images. For a list of features of pivot, refer to Section 3.2, “Features of pivot”
These days, almost everyone has a camera, be it a proper digital camera or a camera in the smart phone. Also, almost everyone has piled up many many images somewhere on the hard drive. Have you ever ...
... wished to organize them into a proper (date and time based) directory structure?
... been annoyed by different time stamps in images of different cameras ?
... wanted to add names (like "stay in Spain") in addition to the date based folder structure ?
... capitulated when seeing thousands of folders of images with no apparent structure ?
... lost track of your own type of image organization?
Then you should consider giving pivot a try! If you are hooked, read on to Section 3.2, “Features of pivot”
Pivot comes with a long list of features. If you're not sure how to use these features, you may want to refer to Section 5, “Exemplary Use Cases”. With pivot, you can:
copy photographs and videos from the camera to a pre-selected folder on the hard drive
copy photographs and videos from a folder on the hard drive to a pre-selected other folder
flexibly setup up the renaming process of the copying, including sub folders creation (e.g. by year and/or album)
setup albums based on the creation date of files.
adapt time differences of files from different cameras. This includes EXIF meta data adaptation
setup multiple destination targets. For instance, one destination is the actual gallery, the other one a backup path. You can:
(de-)select every file individually for each destination
choose different naming conventions for each destination
preview the copy results, before actually copying
rename existing files to fit with the newly copied files (only changing of numbering, including changing the number of digits to match the overall number)
add comments to files and hence, to the destination copy of the files, as well - if you wish so.
adapt a lot of settings to your need
remember already copied files. Depending on the settings, these files won't be copied again.
recognize duplicate files based on a MD5 hash. Only one of these duplicate files will be copied - depending on the user settings.
recognize file times on different ways, if no meta data is present (i.e. for videos)
save adapted file data, as well as album data between sessions
take care of raw/jpeg combinations in the way you like (e.g. same numbering)
Go to sourceforge and download from there: sourceforge.net/projects/pivot-photo/ -> Files. Make sure you select the current version and an appropriate file for your operating system (i.e. windows installer for 32/64 bit windows).
Download the latest file for your operation system from pivot files. If your operation system is 64bit, I reccommend you choose the respective 64bit version of pivot.
The binary installation package is self-explanatory. Download and execute it (download file ending on win32.exe or win64.exe). Tested with Windows 7, 8, 10 (64bit).
For Debian-like systems (tested with Ubuntu) download the respective .DEB files.
Install the pre-requisites:
sudo apt-get install libqt5multimediawidgets5 libqt5multimedia5-plugins qt5-image-formats-plugins.
Now install pivot with
sudo dpkg -i pivot-x.y.z.deb.
Start the program with pivot.
For RPM-based systems (tested with Fedora 22) install the following pre-requisites:
sudo dnf install qt5-qtmultimedia qt5-qtsvg.
Now install pivot with
rpm --install -p pivot-x.y.z.rpm
Start the program with pivot.
Tested with Ubuntu 14.04, 15.04 and Fedora 22-3 (for all with both 32, and 64bit).
You will need cmake and the third-party modules libraw, libexif and Qt5.
If, for example you want to build in ubuntu, do:
sudo apt-get install qttools5-dev-tools qttools5-dev qtbase5-dev
       libqt5svg5-dev libqt5opengl5-dev qtmultimedia5-dev
       libraw-dev libexif-dev cmake
.
For fedora you would install the following dependencies:
sudo dnf install cmake gcc gcc-c++ qt5-qtbase-devel qt5-qttools-devel qt5-qtx11extras-devel qt5-qtmultimedia-devel LibRaw-devel libexif-devel qt5-qtsvg-devel.
Now build pivot:
                mkdir build

                cd build

                cmake -DCMAKE_BUILD_TYPE=release path/to/pivot-X.Y.Z/pivot/

                make

                (make install)
Go to sourceforge and post your issue there: sourceforge.net/projects/pivot-photo/ -> Tickets or Discussion
The first thing you do is taking photographs and videos with your (digital) camera. This is the beginning of the processing workflow. People copy their images to the hard drive, keep them in a certain organization. Some of the images will be deleted, others will possibly be enhanced. Then, finally, these images will be presented, usually by collecting the file in any kind of galleries. The presentation can be done by printing the files or by showing them on screen, for instance.
However, this is already about as much similarity in the workflow as possible. Every part of the processing is carried out differently, due to a variety of reasons. In the next sub sections, a couple of suggestions and ideas for organizing your photographs will give you the possibility to optimize your own collections.
Do keep your original files! Not only for backup reasons (see Section 2, “Preface 2: Do Backups !”) but also for possible future ideas of yours. In future, you may want to...
use a higher resolution of an already down sampled photograph
use a a different white balance import from your RAW file
look for an image previously considered as worthless
There are many more reasons, why you want to keep all files, which you might not even think of, yet. You should keep the original files as a copy of your proper gallery structure. Pivot supports you in following this types of structure.
Whenever the camera supports it, always also save a copy of the image in RAW format. Some cameras also support saving a RAW+JPG of a single photograph. Do it even if you don't know what RAW files are, if you use them only occasionally or if you think this is not worth the storage space taken. You may always want to come back to certain photographs for a different (aliasing free) color/brightness adaptation, white balance or other post-processing steps. Even if you don't know about RAW processing just now, you may in the future...
Note
Nowadays, device space is not an argument, anymore. But make sure, you follow some general rules of storing data, see Section 2, “Preface 2: Do Backups !”.
Note
A few words on the file type: JPG is a lossy compression format. RAW files are mostly proprietary formats of camera vendors. In both cases think of converting the data to PNG (portable network graphics) or DNG (Digital Negative) formats, respectively. The former for loss-free processing of images and the latter for being able to read these files in the future.
The way, people store and view their images differs a great deal. Usually they know where to find images and remember their rough dates taken. But this structure fails immediately when exchanging images with other people. Even if your collection grows large, you will lose track of your organization. In the next couple of paragraphs, some problems and respective, useful principles will be presented, which may help organizing your photographs a lot better.
Insert the acquisition dates into the filename !!! This cannot be stressed enough. Acquisition dates are usually stored in both, the files' meta data and the files' time stamps. But both WILL, I repeat, they WILL be deleted or changed. This results in losing your organization. Also if you call your folders similar to "Trip to Paris" you will lose control after having a couple of these kinds of folders.
Another point is that many digital cameras import their photographs and videos to a folder named by year, month and possibly day, too (e.g. "2012-05-01"). This is bad, as well - I would bet almost any money that you don't remember what's inside the folders after one or two years.
There are database supported gallery systems. Then the filenames don't really matter. But this is wrong, since you may want to give away your files. The recipients then won't get any idea of your files theme's and acquisition dates. So rename your files before plugging them into databases. pivot is intended to do exactly this, copy, pre-select and rename images before you continue working with these files.
In Section 4.1.1, “Keep all files” you were strongly suggested to keep a second, complete copy of all files in a different structure. This, however, introduces the problem of having two possibly equally named files of one photograph. This may happen, for instance, in database systems, which read all files and let the user do some sorting, processing, etc. You are probably not able to distinguish beween the original file and the one ready for processing. On the one hand, don't let your database scan your orginal files anyways, but on the other hand, preceed the original files with an "O_", just to be sure.
To conclude the above points: Create a structure where you include the acquisition dates and a short description in both, the possible folders and the actual file names. Go from biggest to the smallest date. So always start with the year, followed by the month, the day and finally the description (e.g. " 2012/2012-05-01 Trip to Paris 01.jpg"). This way, even if you lose time stamps etc, you can still properly sort the files with respect to the time by using names. Use pivot for this task, this will save you a great deal of time and stress.
The above paragraphs presented a couple of problems which may occur when working with un-organized photograph and video files. Now, a good folder structure may look like this (this has also been suggested similarly from other authors, www.henner.info for instance):
        ├── My Pictures
        │   ├── 2011
        │   │   └── 2011-03-27 Emmy's Birthday
        │   │       ├── 2011-03-27 Emmy's Birthday 01.jpg
        │   │       ├── 2011-03-27 Emmy's Birthday 02.jpg
        │   │       ├── 2011-03-27 Emmy's Birthday 03.jpg
        │   │       └── 2011-03-27 Emmy's Birthday 04.jpg
        │   └── 2012
        │       ├── 2012-05-02 Trip to Paris
        │       │   ├── 2012-05-02 Trip to Paris 01.jpg
        │       │   ├── 2012-05-02 Trip to Paris 02.avi
        │       │   └── 2012-05-02 Trip to Paris 03.jpg
        │       └── 2012-07-05 Trip To Spain
        │           ├── 2012-07-05 Trip To Spain 01.jpg
        │           ├── 2012-07-07 Trip To Spain 02.jpg
        │           ├── 2012-07-07 Trip To Spain 03.jpg
        │           └── 2012-07-09 Trip To Spain 04.jpg
        └── Original Pictures
            ├── O_2011
            │   └── O_2011-03-27 Emmy's Birthday
            │       ├── O_2011-03-27 Emmy's Birthday 01.jpg
            │       ├── O_2011-03-27 Emmy's Birthday 01.RAW
            │       ├── O_2011-03-27 Emmy's Birthday 02.jpg
            │       ├── O_2011-03-27 Emmy's Birthday 02.RAW
            │       ├── O_2011-03-27 Emmy's Birthday 03.jpg
            │       ├── O_2011-03-27 Emmy's Birthday 03.RAW
            │       ├── O_2011-03-27 Emmy's Birthday 04.jpg
            │       ├── O_2011-03-27 Emmy's Birthday 04.RAW
            │       ├── O_2011-03-27 Emmy's Birthday 05.jpg
            │       ├── O_2011-03-27 Emmy's Birthday 05.RAW
            │       ├── O_2011-03-27 Emmy's Birthday 06.jpg
            │       └── O_2011-03-27 Emmy's Birthday 06.RAW
            └── O_2012
                ├── O_2012-05-02 Trip to Paris
                │   ├── O_2012-05-02 Trip to Paris 01.jpg
                │   ├── O_2012-05-02 Trip to Paris 02.avi
                │   └── O_2012-05-02 Trip to Paris 03.jpg
                └── O_2012-07-05 Trip To Spain
                    ├── O_2012-07-05 Trip To Spain 01.jpg
                    ├── O_2012-07-07 Trip To Spain 02.jpg
                    ├── O_2012-07-07 Trip To Spain 03.jpg
                    └── O_2012-07-09 Trip To Spain 04.jpg
Observe the following aspects of this structure:
There are two different folders for actual gallery and original files
The folder files may have different dates compared to the parent folders (e.g. "Trip to Spain")
The date is repeated, for two folders (year and album) and again for the filename. For the reason see the above paragraphs
Videos are mixed with image files - in the correct order and with a consistent running number
The originals folder may contain the RAW files, as well (with the same running number).
The originals folder has all files, so usually a lot more than the actual gallery
Do not allow database system have access to the original files folder
Note
There is a lot more to the workflow of photographs than just renaming, selecting and copying files. This includes white balance adaptation, post-processing, tagging, rating and many more steps. Use pivot for the copying, renaming etc and then go to, for instance, "digiKam" (open source) and do all the other stuff there.
Note
A general hint: Since you have a copy of the original files anyway, remove as many photographs for the gallery, as possible. That is, remove blurred, repeated, unpleasant, boring images and keep only the good photographs (whatever good means to you). This helps keeping people interested in your presentation.
This section explains how to use pivot in the easy or basic mode:
In the current version, pivot is only able to read files directly from you camera in the ubuntu/unity environment. For all other systems, plug in your camera and copy the files to some place. Start pivot, click on load source directory and locate this place.
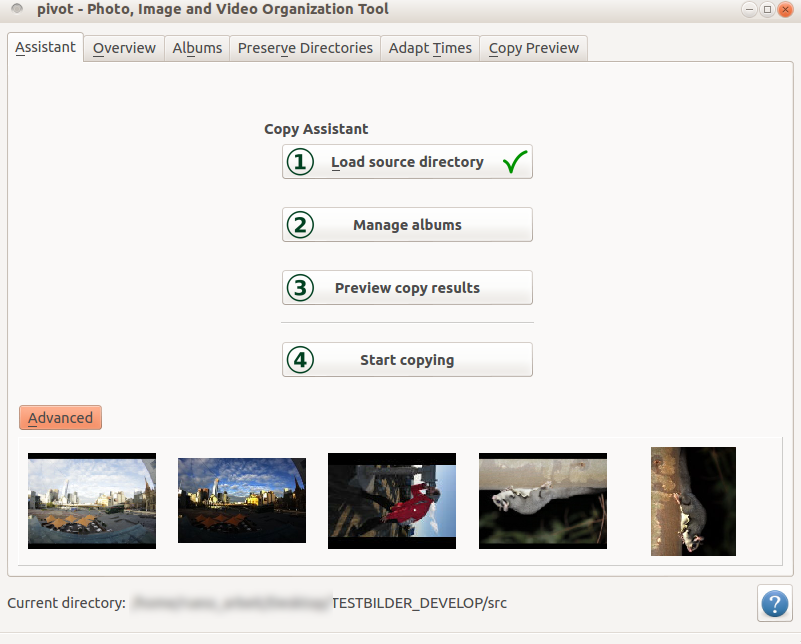
pivot will start and load the images on the camera (or the directory). pivot will appear with the copy assistant tab being selected, see Figure 1, “pivot start screen”
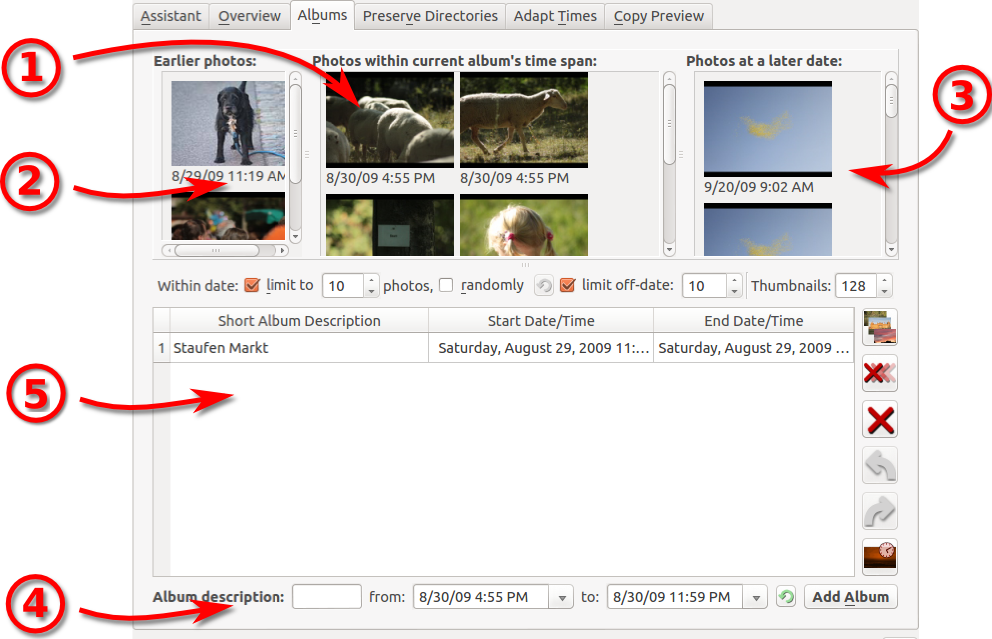
In the assistant tab, click now on "manage albums". The album tab will be opened, see Figure 2, “pivot album organization”. Here you can organize all of the files into albums. This is based on the image creation dates. In the upper row of the album management there are three group boxes which will show image thumbnails from your files. In the center box, all files taken within the specified time span are displayed (1). On the left hand side (2) files taken before the specified timespan are displayed. Similarly, on the right hand side, the images after the current time span are displayed (3). At (4), you can add new albums for a selected date. If you wish to automatically enter a time for files not yet covered by an album time span, click on the symbol with the small clock icon in it. It can be found in the area (5), there on the very right-hand side, where you can manage all existing albums.
Now go back to the assistant tab. There you can now preview the result of the copying process. In the basic setting, the files will be copied into new folder of your source folder. Files will be sorted into folders based on the year, the date and the album name. For changing the copy destination behavior, go to the settings (File -> Settings).
Note
Right click on the album list or on image thumbnails for more options via the context menu.
Note
For the destination copying behavior, you can use absolute or relative (to the binary) paths. There also exists a tag for the current source folder
In this scenario you have a bunch of images, possibly from different cameras, over a larger time span. This also includes some videos and images without meta data. First of all make yourself comfortable with the basic method from Section 5.1, “Quick Start: copy files from your camera to your hard drive”.
First of all, switch to the advanced assistant mode, see Figure 1, “pivot start screen”. You will be presented a couple of more options. Now load a directory with possibly many images, videos and other sub folders.
Now, click on "Review dates, times and albums". This switches to the tab with a list of all of the files. Here you can edit all files directly. You can change the file times, change the assigned albums, enter comments (if comments have been enabled, see settings), etc.
Note
Right click on the image list or on image thumbnails for more options via the context menu. Select more than one image to use additional context menu items, like group re-assigning of time.
Note
You can always come back to this file review, whenever you have adapted times or changed albums, the file list may change, as well.
Note
You can check or uncheck files in the file list. This allows you to completely disable the copying of these files by unchecking. A more detailed way of enabling single files for different destinations can be found in Section 5.2.2, “Image viewer / Select files to copy for each destination” - this requires the respective file to be checked in the file overview list (which is standard behavior). However, you can also use the file overview to distinguishably select for single destinations. Just enter the respective destination number in the respective column.
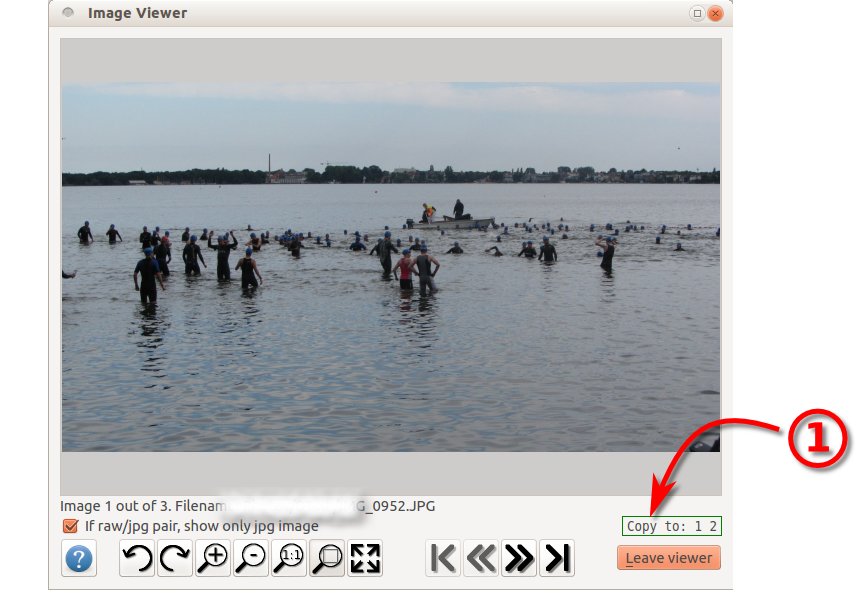
In the settings of pivot, you can enter a different number of copying destinations (e.g. all files go to a backup folder and a smaller subset go to the actual galleries folder). You can enable and or disable files for particular destinations by using the file overview list (see Section 5.2.1, “Review of files with file list”). But it might be easier or more handy by actually viewing these images. So start the image viewer by clicking on "View files and select for target". An image viewer will pop up. Apart from some standard control elements, you can group corresponding raw and jpg images (will only load and display the jpg image). Most importantly, you can select each file for different destinations by pressing the respective number key, see Figure 3, “pivot image viewer”. The destination number will appear or disappear on pressing the keys, indicating the copying status for the respective destination (1). In full screen mode, this will be indicated in the upper left corner.
Note
Use the image viewer the review you files, even if you don't want to change the copy destinations for the images.
Note
Use the PageUp and PageDown keys to go through your images. Use the Home and End keys for the first and last image. Use "CTRL+ +" and "CTRL+ -" to change the apparent size of the current image. The keys r and l rotate to the right and left, respectively. CTRL+S and CTRL+F are for 1:1 size and fit to window, respectively. F11 switches the fullscreen mode.
In many cases, different cameras have different date and time settings. Sometimes this is just OK, sometimes the temporal order of merged files is just wrong. Pivot provides a tool to selectively adapt the times of two different folders (i.e. folders with files from different cameras). The only thing what you need is either an image pair roughly at the same time or you simply know the camera time difference.
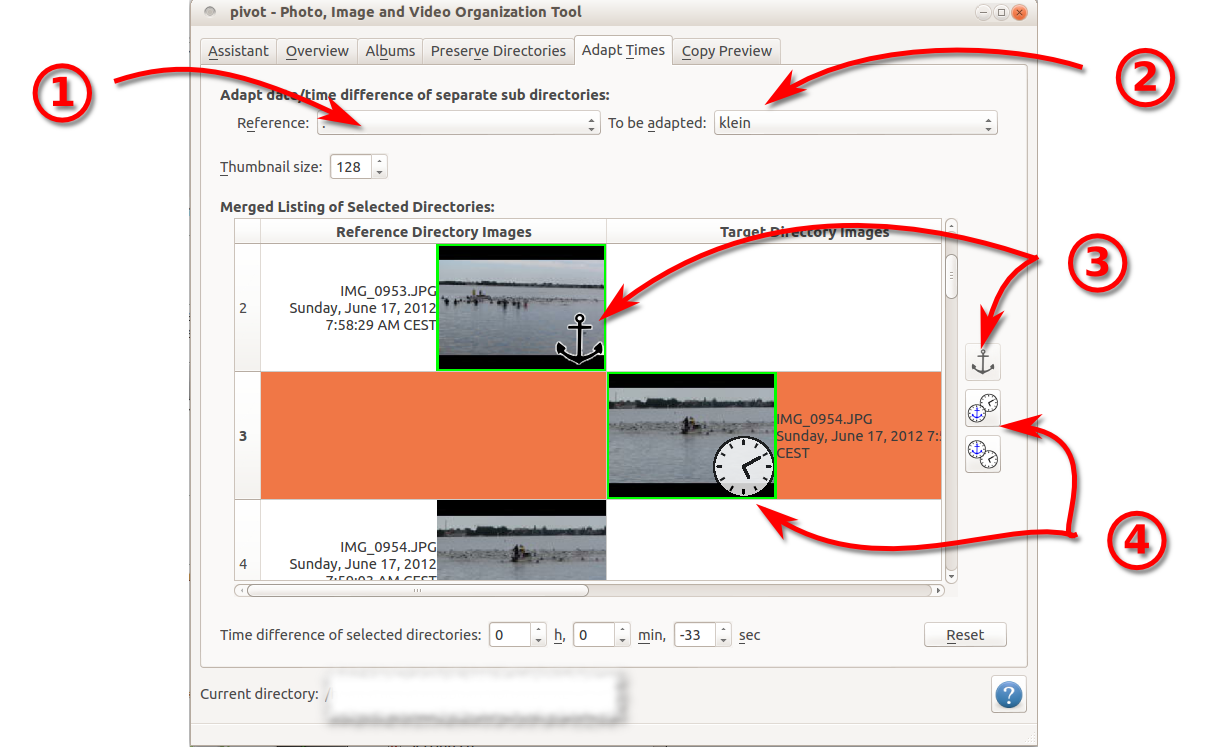
In the advanced assistant view, click on "Adapt times from different cameras". Then you are presented a table with two columns, see Figure 4, “pivot Adapt Times”. First of all, click on the reference folder and a folder to be adapted, from the two drop down boxes (1) and (2). In the first column of the table, you see the reference image folder. In the second column, you can see the folder to be adapted. The overall order of both columns (potentially alternating, as you may have noticed) is determined based on the file's creation dates and the current time difference. You can manually enter the time difference. However, it might be easier to select a pair of files in the first and second column and click the anchor(3) icon (first column selection) followed by one of the time icons(4) (for the second column selection). The program determines the difference and updates the order.
Note
In the settings, you can have pivot to update the time meta data based on the adapted times. This will be performed on copying, for the new file, only.
With this option, you can create new subdirectories in the destination folders. This, for instance, is useful for a backup destination, when you want to keep files from different photographers in different folders. It may help ensuring ownership, even if images get mixed up in the final gallery.
You'll need to do two things. Click on " different directories for different photographers". Create a mapping there (source -> destination sub folder). Enable the respective tag in the settings.
If you want to scan a family album, for instance, you may not exactly know the exact day of the picture being taken. Also, you may have additional comments or description of the circumstances, which you want to add to the filename.
Before you continue reading, make yourself comfortable with the pivot concepts from Section 5.1, “Quick Start: copy files from your camera to your hard drive” and Section 5.2, “Advanced: organize a pile of images (& videos) on your hard drive, possibly from different cameras”.
Open you directory with scanned photographs. Most of the work will be performed in the image overview list, Section 5.2.1, “Review of files with file list”. For each of the files, you'll need to enter a date for each file.
Since you may not exactly know the day or time the photographs were taken, go to the settings dialog (File -> settings) and enable the limited date handling option under the date and time tab. This enables a check box for the image overview list, where you can set a flag, indicating that you don't know the exact day or time. You can go to the destination tab and use two additional tags calle [UnknownDay] and [AlbumUnknownDay]. They can be freely defined, back under the tab for date and time settings.
In the settings, you can also enable the use of a comment for each file. There is a tag, [COMMENT], for the destination settings, which will be replaced with either an empty string or, if given, the comment (preceeded by a white space).
Now you can manually edit all of your files. Make use of selecting multiple files and copying the date and/or album via the context menu. This will save a lot of time. Finally, make a preview of your copying to double check all of your file editions and the result.
If certain widgets of the application are not quite clear, hover the mouse over it. Information about it will be displayed in a hint and/or in the status bar of the application.
Additionally, sometimes it might be helpful to enter the help mode. This is the button with the question mark. Click it, then click the element which you want to have help for.
If you like the software, if you wish to say thank you or if wish to support further development of the software, consider making a donation to the author (no tax deduction). This can be done directly via the projects's sourceforge donation page, https://sourceforge.net/p/pivot-photo/donate, or by writing an email to donate at dominik-ruess.de. Thank you.
You can find version 3 of the GNU GPL here: http://www.gnu.org/licenses/gpl.html. A copy of the license is also contained in the program source code.